Thursday, November 1, 2012

More Guts!

Okay!  The demolition disease spread from one room to another.  We decided that it would make sense to go ahead and open up the rest of the upper family room.  We knew there was some concern about wiring and potential structural and/or framing issues.  However, despite it not being PERFECT behind those walls, we were pleasantly surprised.  Structure and framing are pretty good.  A couple of the headers need jack studs and reframing, and the pass-thru from the family room to the "sun room" needs a major header re-frame, but it's all straight-forward stuff.

Something else we've got up our sleeve, is a major change to the wall between the room with the wood-burning stove, and the upper family room.  Double pocket doors will replace the single 5-panel door.  The double pocket doors will be 15 lite "french doors" similar to style that is in the dining room.  This will open up the house from front to back, yet still give us the option to divide that room off without loosing all the natural sunlight that floods that side of the house.  This will require a MAJOR re-frame of that wall, including a 13-foot engineered beam, but the end results should be just what this house needs to flow into the family room area.

With the rooms completely opened up, we can now pull new electric and bring it all up to code, AND...  we can also pull a new, larger cable to the garage so it can have the power we need for the shop tools that sit waiting to be plugged in.

OH!  And the fireplace is finally uncovered!  :)

The pics...


The chimney and fireplace is finally exposed!


Unfortunately the fireplace was plugged.  HOWEVER!  We had a chimney inspector out to evaluate all our chimneys and fireplaces.  They can all be restored.  Even this one.  The plug is in there because the floor of the firebox was knocked out to provide a vent for the oil heater that was below the family room.  Relatively simply repair and WILL be done!  The plug appears to have been constructed outside of the fireplace and then set in place.  It isn't very thick.


Door to master


The wall that will get re-structured and double pocket doors installed.


Hmmmph...  the one big(ish) framing issue we an into.  The load is picked up and transferred to the ceiling joists in the adjoining sun room.  Not ideal.  BUT!  It will be an easy re-frame.  It was also interesting to see where the old exterior door to the breezeway used to be.


And THIS is a little alarming.  Nobody is allowed to walk under those bricks until they are supported.  HAHA!  Geesh...  HACK JOB!!!


Pass-thru to the lower family room was MOSTLY right.  Jack studs just aren't really correct on one side.  Actually looks like a couple were deliberately cut out.  Easy fix!


Then there's the wiring.  Amazingly, it's in good shape, but there's no reason to keep it.  It's also 2-conductor, so no ground.  Illegal by today's standards.  Wiring is relatively inexpensive and important.  Best time to fix it is now.


That's all for now!  Next will be the fun stuff!  FRAMING!


Monday, September 24, 2012

Head Room and Entrances

So, I think we can say the renovation has officially started.  One of the things that has been really bothering us about the family room is an attached addition that we've been calling "the sun room", since it probably has more windows than anything else.  The room also has two exterior doors and a low ceiling.  The two doors won't be addressed for awhile, but the ceiling really needs to be changed.  This area is meant to really be the main back entrance to the house, and it feels very tight and stuffy when you walk in the door.  So, to make the room feel bigger and more dramatic, the ceiling will get raised or vaulted.  But first, we had to see what was up there...

Getting started, I realized pretty quickly that the ceiling was plywood.  What a pain!  And somehow they managed to get it between the top plate of the wall and the ceiling joists.  I don't even want to know how they did that, or why.


With all the plywood, crappy and gross insulation down, a real inspection could be done.  Turns out it's definitely something that was constructed in the last few decades, with fairly modern materials, or at least material sizes (2x6's and 2x4's instead of actual rough cut lumber).


The tongue and groove planks for the roof appeared to be in great repair.  A big relief!


But, I was still seeing some things that didn't seem quite right.  Not necessarily wrong, but just strange and not your typical "framing by the book", but pretty sturdy.  The wire routing was what really caught my eye.  Not supported well and will need to be addressed.


Oh yeah, and about 20 mud dobber nests!  Thankfully all old and evacuated.  But, they still give me the heebee-geebees, for some reason.


With all that, it was pretty much necessary to pull the rest down.  The walls were easy, but revealed a few more things.  Mostly I wanted to make sure the wiring was correct as well as insulation and of course structure.  Basically it's a clean slate now!


Time to start planning the next step.  Raising the ceiling!  It just may get a cathedral ceiling with raised double collar ties, boxed and stained.  I'll have to do the math on the structure, though.  The look is worthless if it won't hold the roof up.  I already know that the windows don't have the proper framing.  So now is the time to fix it.

Floors - Phase 1

Okay.  The best part of the house, is the floors.  Well...  Most of them.  Some of them need a complete overhaul.  First up, is the intended family room.  The wood floors were covered with vinyl flooring, of some kind.  Really big pain in the rear!

So let's begin!  I did a little research, found a few ideas on removing this stuff.  Everything from toxic chemicals to WD40.  Even boiling hot water.  I was thinking, YEAH RIGHT!  This stuff is stuck good. Water would never work for this...

First, the vinyl had to be scraped up off the floor.  Inch by inch.  And of course the glue wouldn't come up with it.  That would be far too easy...


Some disappointment by one of the doors.  The threshold seal was toast, and leaked pretty good.  Floors were water logged, dried up, and splitting.  Not good!  I'll have to start looking for some narrow oak planks.


Well.  As it turns out, boiling water WORKS GREAT!  Several people said to boil water and lay out a towel on the areas where the glue was left behind.  That would take forever, so I went to Home Depot and bought a nice little wallpaper steamer for cheap.  30 to 45 seconds, one section at a time, a putty knife, and it slides right off the wood.


And now I can get a better look at the hidden surprise.  A fireplace hearth, and sure enough, some patch work in the wall and trim.  A sure sign that there's a fireplace, in some condition, behind that wall.  Tile is in poor shape.  Several with cracks.  Probably cannot be salvaged, but we're starting to find places with salvaged tiles and reproduction tiles.  Maybe we can find what we're looking for.


And finally, after weeks of picking at this flooring glue, the end result.  Still a ton of glue residue, but anymore water will surely ruin the floor, so the rest will be left for the rough pass of the floor sander.


Awful job with the ductwork.  Appears it was put in with the carpet padding in mind.  Sits up really high.  They'll get repaired and lowered, and/or moved to another location.


And now we can see the floor rot.  Oofa!  BAD!


A circular saw, wood chisel, and some careful work, and the rotten oak tongue and groove flooring is chipped out.  Had to be careful not to damage the surrounding pieces that were still good.


Unfortunately, the subfloor is rotten as well.  So, more planks will have to be pulled to do a proper subfloor repair.


That's it for now on the floors.  Great start!

Thursday, August 9, 2012

In and Getting to Know the House

So, after closing on the house, the obvious thing is to drive directly to the house and do the "now that we own it" walk through.  You know, that one where you walk through and see everything in a slightly different light.  When you see all the things you didn't want to see before.  Haha!  But, we knew what we were getting ourselves into.  We wanted an old house, we wanted to have some renovation projects, and we wanted something that we could make "ours".  That's exactly what we got!

The first thing we noticed was, we ALSO got a flea problem, courtesy of the previous owner.  No extra charge.  UHG!  So that meant a professional had to come immediately  A friend of ours hooked us up with a great pest guy and we took control back of the house...  after spending several nights in a hotel.

At this point it was evident that we were going to uncover more pet related issues.  Starting with the master bedroom.  The wood floors in the master bedroom had obvious pet odor problems.  Urine in the floors...


So the thing about oak floors is they change in color when they get wet.  Not all the spots on the floor were pet related.  Probably just water that wasn't cleaned up fast enough, or whatever.  BUT.  There were a couple bad spots in the room.  One was by the old fireplace hearth.


The other was along the wall next to the master bathroom.


The floor got so damp, the planks actually warped in this area.


First thing was to use an enzyme cleaner.  Everyone recommended Nature's Miracle.  WELLL,  It worked a little, but it really didn't remove the odor like I had hoped. 


What REALLY made a dent was straight Hydrogen Peroxide.  A trip to Sam's Club made for some cheap ammunition.  The peroxide bubbled up immediately.  Was pretty awesome, actually!  It brought a lot of the urine right out of the wood.  After letting it sit for a few minutes, it was wiped up, so not to damage the floors further.


Next, a sight that looked more like a scene from the movie Scarface.  Haha!  Arm and Hammer baking soda is good for a lot of things.  Specifically, it's super absorbent.  So, over the areas it went.  Then swept up, put aside, and the process was repeated.


Below is a shot of everything that was used.  The only things not shown are OdoBan and Murphy's Oil.  All of them helped a little, but I think the peroxide and baking soda helped the most.


The next area of concern was the upper and lower family room, at the back of the house.  The carpet was gross (as is the color on the walls), so all the carpet came out the very next day after closing.


It was interesting to see the slab underneath.  That slab is going to lend itself to some more challenges, as it's not level and slopes toward the door.  It will have to be leveled before wood floors can go down.  On a side note, this door and it's surrounding architecture is going to be completely redone and the door removed.  More on that later.

We also learned that the lighter colored slab that sticks out under the stairs used to be an access to the boiler room.  Wait.  What?  A boiler room??  Yep!  There is a cellar under the upper portion of the family room.  It was seen by the inspector and noted, but we never knew what it was.  This COULD potentially be a usable space.  Again, more on that later, though.


Nail/tack strips also needed to come up.


With the carpet gone from the lower portion, it was time to rip up the carpet in the upper portion.  Strange and wonderful things were found.  The first find obviously being the old vinyl floor laid over the wood floors. It really was a great discovery that the wood floors are intact!


In addition to finding the wood floors intact, there was another nice surprise.  Another fireplace hearth!  YEP!  The fireplace that was in the master bedroom is a double fireplace.  Another very exciting find!  Also explains why the molding is completely different in this location.


But with the good discoveries or course came the bad ones.  The threshold weather seal on the exterior door was bad and naturally lead to severe water damage to the floors in that area.  BOOO!  This is major, but not a huge surprise.  A little extra work will have to be done to repair that section.  Pulling the vinyl flooring will show just how much work is there.


But everytime I see the damaged floors, I remind myself that the rest of the floors in the house are in pretty good shape, considering their age.  It always helps to go back and look at this picture to remind myself these floors will look beautiful again...


So...  It has begun!!!!  Stay tuned!!!!  Some floor restoration coming up...

- Scott

Sunday, August 5, 2012

The House

Would you  like to see what on earth we're up against, here?  How about some pictures?

These pictures are far from flattering.  They were taken at our final walk through just before we actually purchased the house.   Without having a floor plan, it's difficult to explain where in the house each room is, but you'll at least get the idea of where we are starting.

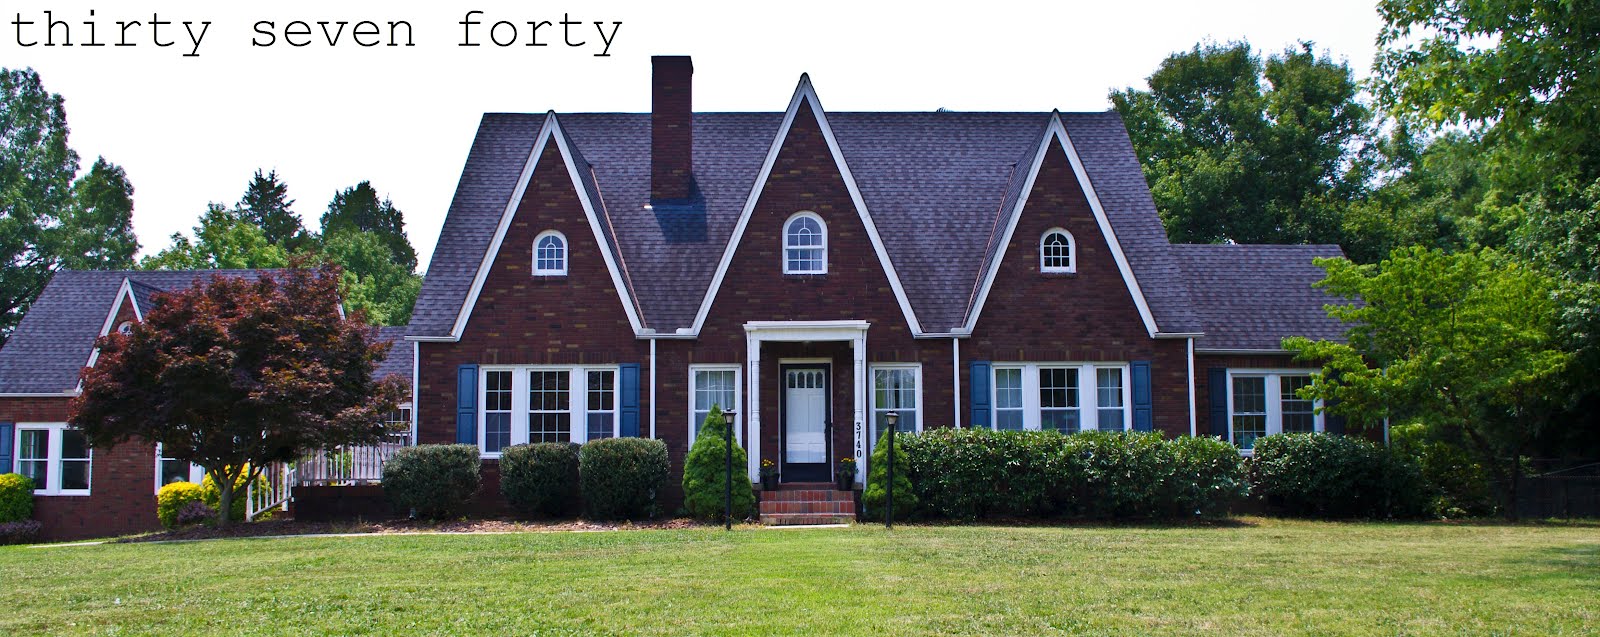
This is our home. Exactly as we received it, less the cleaning supplies that were sitting around for the last minute tidy up, ordered by the seller's agent.

Come On In...


The formal front living room.  This is the room you enter as you come through the front door.  The fireplace appears to be all original with the coal burning fireplace left intact.  We're not sure of it's internal condition.


View from the dining room to the front living room.


The dining room.  It is located to the right of the front living room.


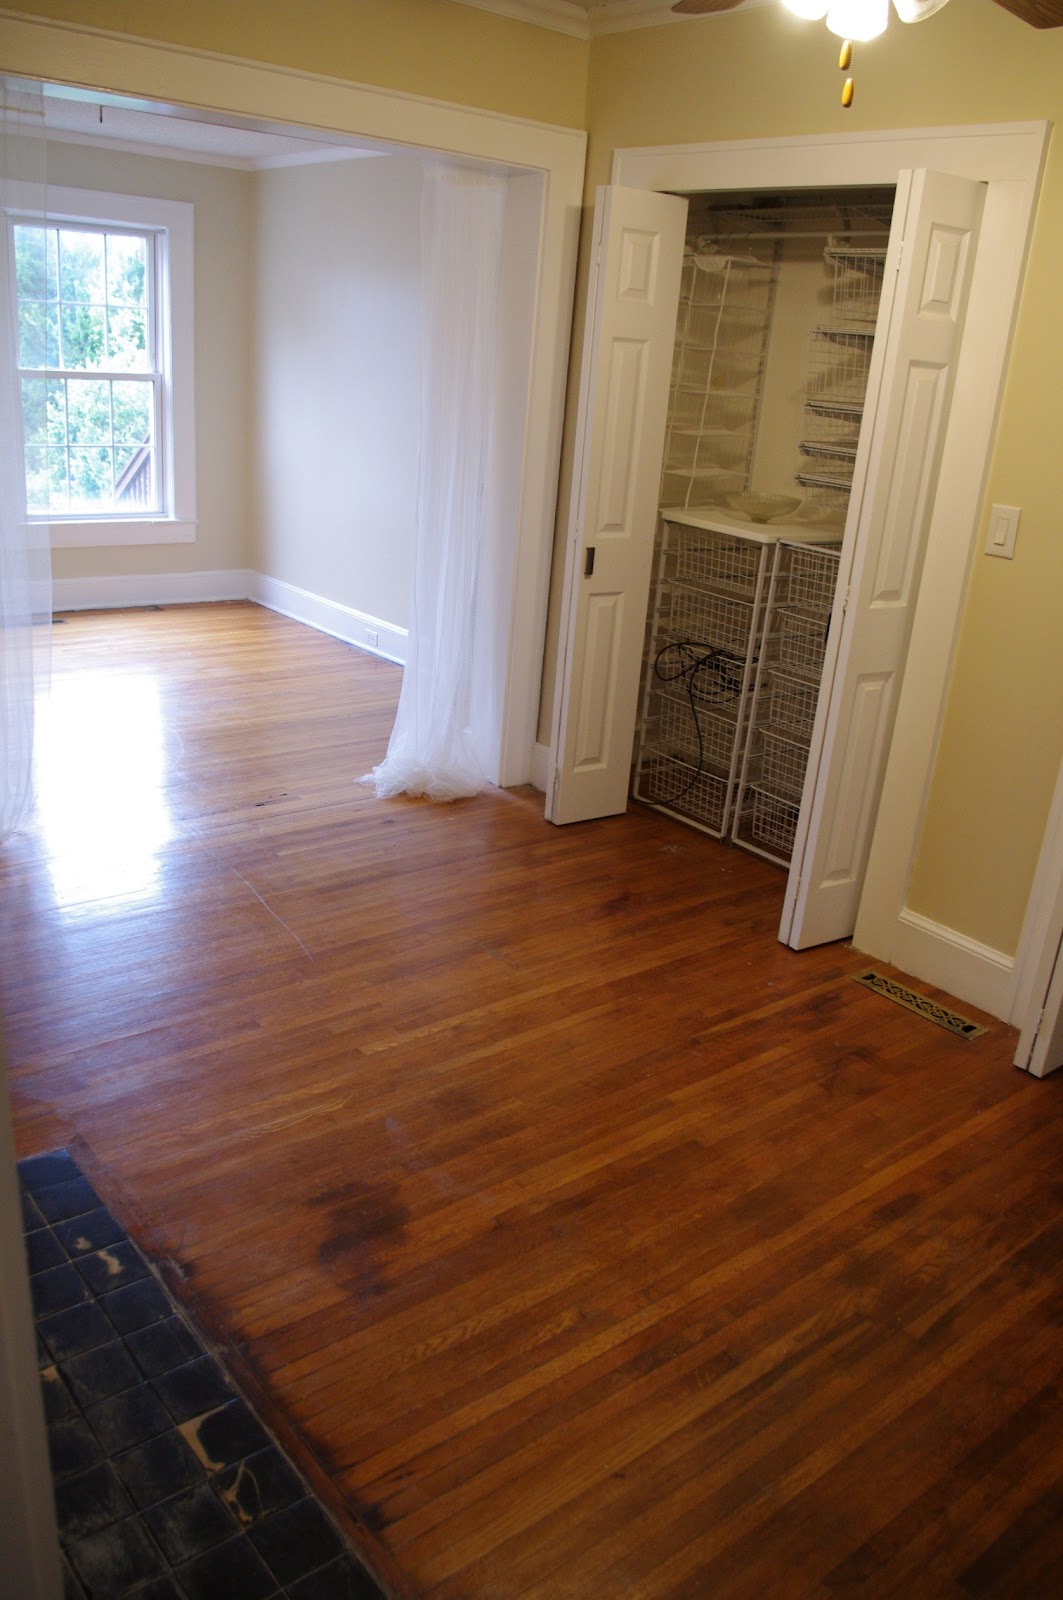
Front, left room.  We are not sure of the original purpose of this room, but it was being used as an office for by the previous owner, who we believed worked from home as a photographer.


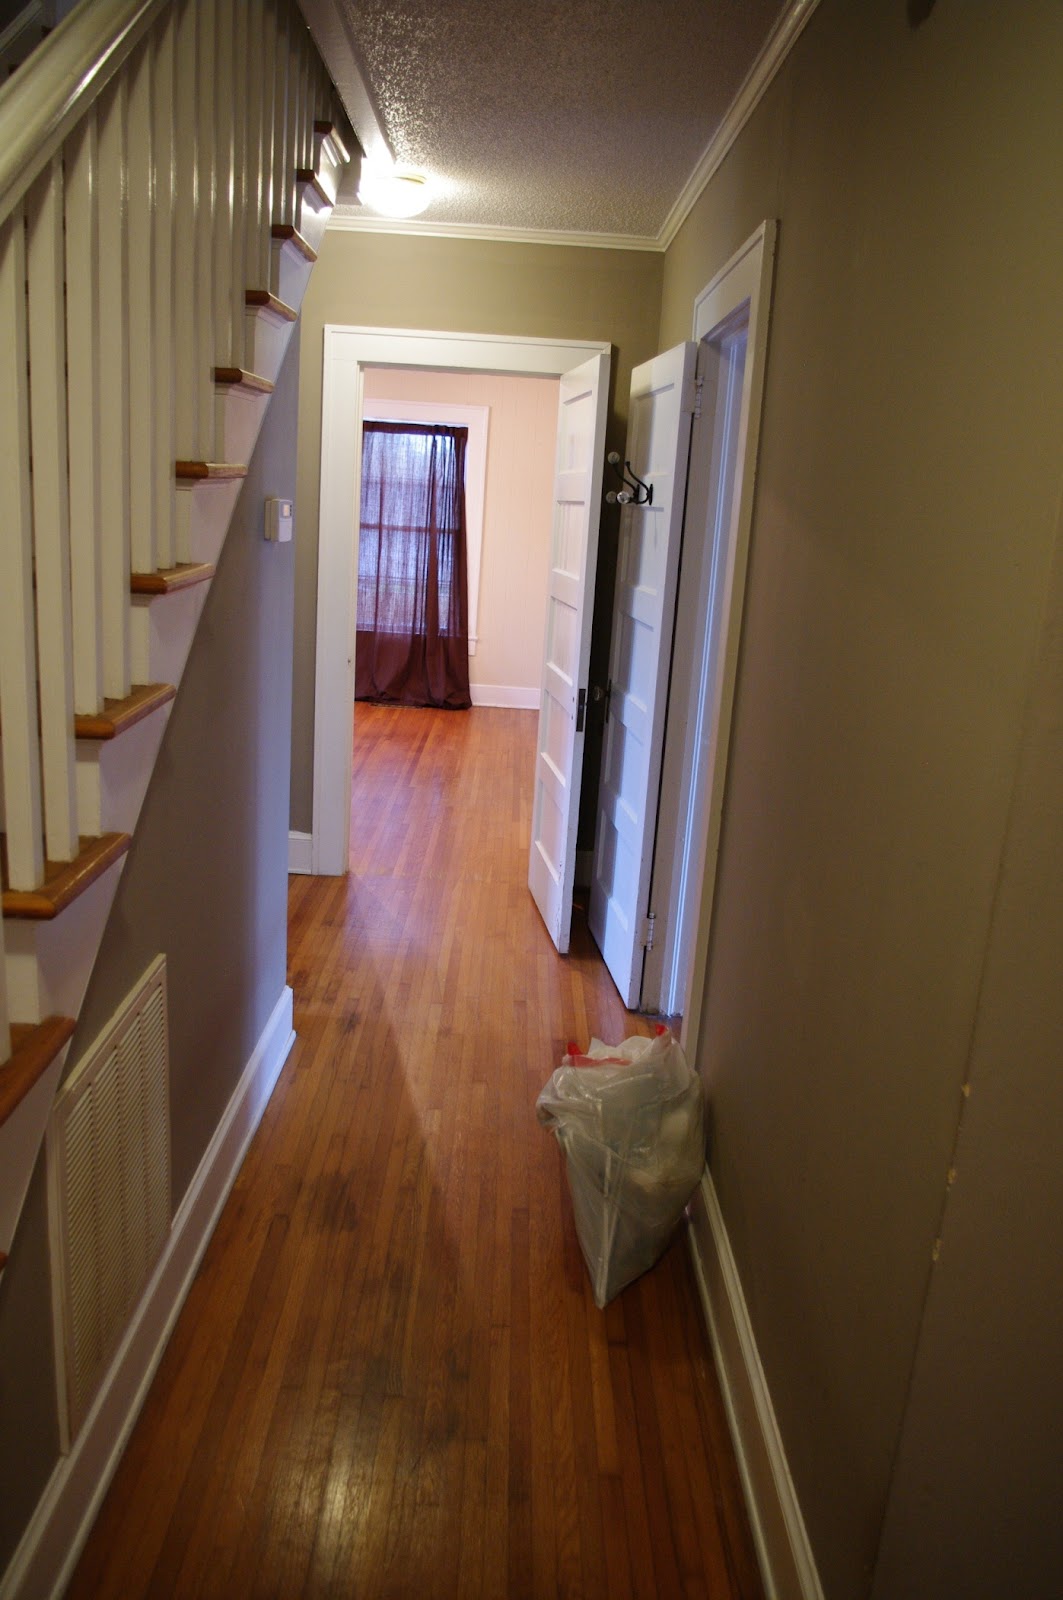
The downstairs hallway, looking into the front left room.


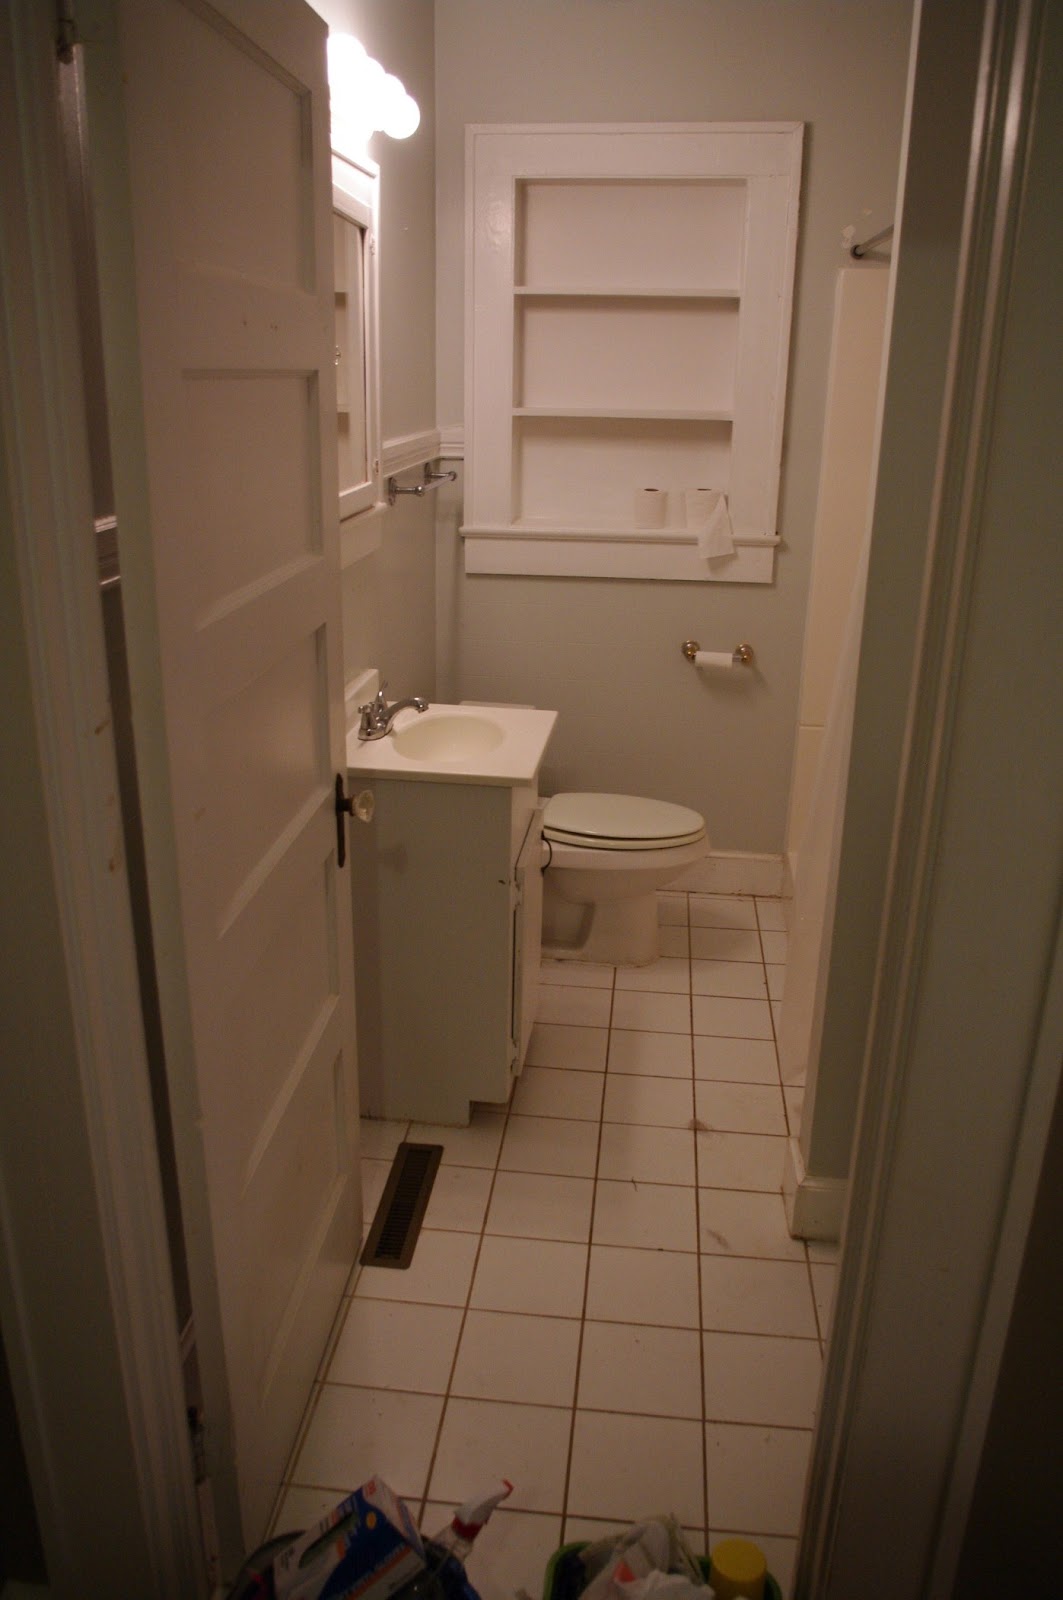
Main full bath, off the first floor hallway.


The stairs!  It is safe to say we're in love with them and they are in fantastic condition!


The kitchen was completely remodeled sometime in the past 5 years.  
Everything was updated at that time.


The stove is amazing.  We both agree it probably isn't where we would have spent our money had we done the remodel ourselves.  However we are definitely psyched that it was installed!!


FINALLY!  A pantry!


There is also a butler's pantry off of the kitchen.  It appears to have the original cabinets.   However, the countertop was replaced to match the kitchen countertop.  
The door goes through to the dining room.


Here is another view of the butler's pantry and hall to the front right room and a nice sized closet.


The front right room has windows on 3 walls.  This room was probably intended to be the actual office or just simply a small bedroom.  Unfortunately, the previous owners found that it was the best place to lock their cats.  What a shame.


Mud room and laundry room.


The master bedroom is difficult to explain.  There are two decent sized closets and the original single door closet, a master bathroom, and a small sitting area.   
However, it is just enough room for a bed and some bedroom furniture.


In the master bedroom we noticed some tile on the floor.  On further inspection, it turned out to be a fireplace hearth!  There is, indeed, a fireplace hidden behind that wall.  That was a nice surprise! The chimney will need to be inspected, though.  We are hoping there isn't a reason it was covered up.


The master bathroom (in our opinion) is... well... tragic!  HAHA!  Not our taste AT ALL, but the worst part is really the quality of which it was constructed.  Lights aren't centered with the mirror and the mirror isn't centered to the vanity.  HA!  Awesome.  At least the plumbing is there for the remodel.  :)


On to the most mysterious portion of the house.  The added rear family room and what we for now, we are calling the sun room because we don't know what to call it.  We found out recently that this portion of the house was actually used as a flower shop at one point.  

There was carpet throughout this portion of the house, and we were only able to guess what might be underneath.   However, there were certainly some good discoveries...  
You'll have to wait and check for updates to see what we found, though!  HWU HWU HWU!


In the lower portion of this section, we found out that several of the walls are actually exposed brick that had been stuccoed over.  We LOVE exposed brick.  We're going to have to see if we can undo all that.  Fingers crossed!


On to upstairs!  


Upstairs hallway.  Aren't these floors gorgeous?


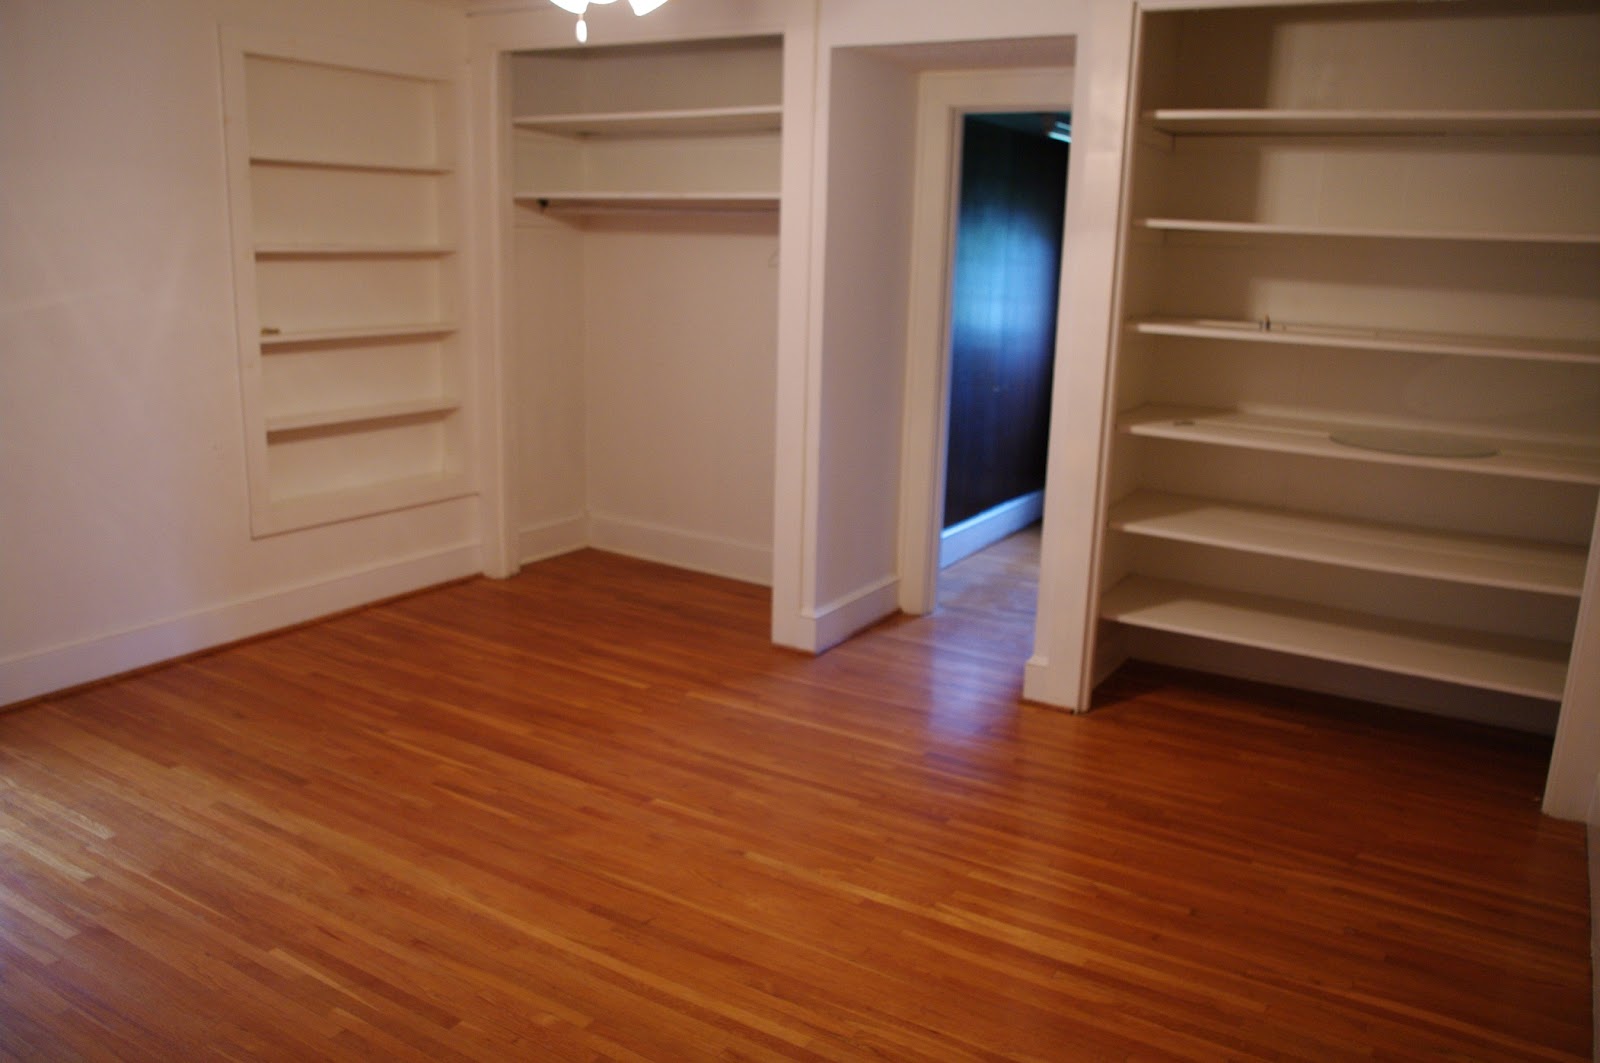
This is the upstairs left bedroom with walk-in closet.


The upstairs right bedroom also has a walk in-closet, a bunch more storage shelving, only ONE outlet (geesh)  and a pretty cool hidden surprise!  Again...  You'll have to wait and see what we found.  


The attic.  It's big.  It's pretty dark.  It's a little creepy.  It's the place we're still not completely comfortable with.  But... there is a bunch of space for storage, and it even has a second level  where the HVAC handler is.  This may one day offer even more room for whatever we need.


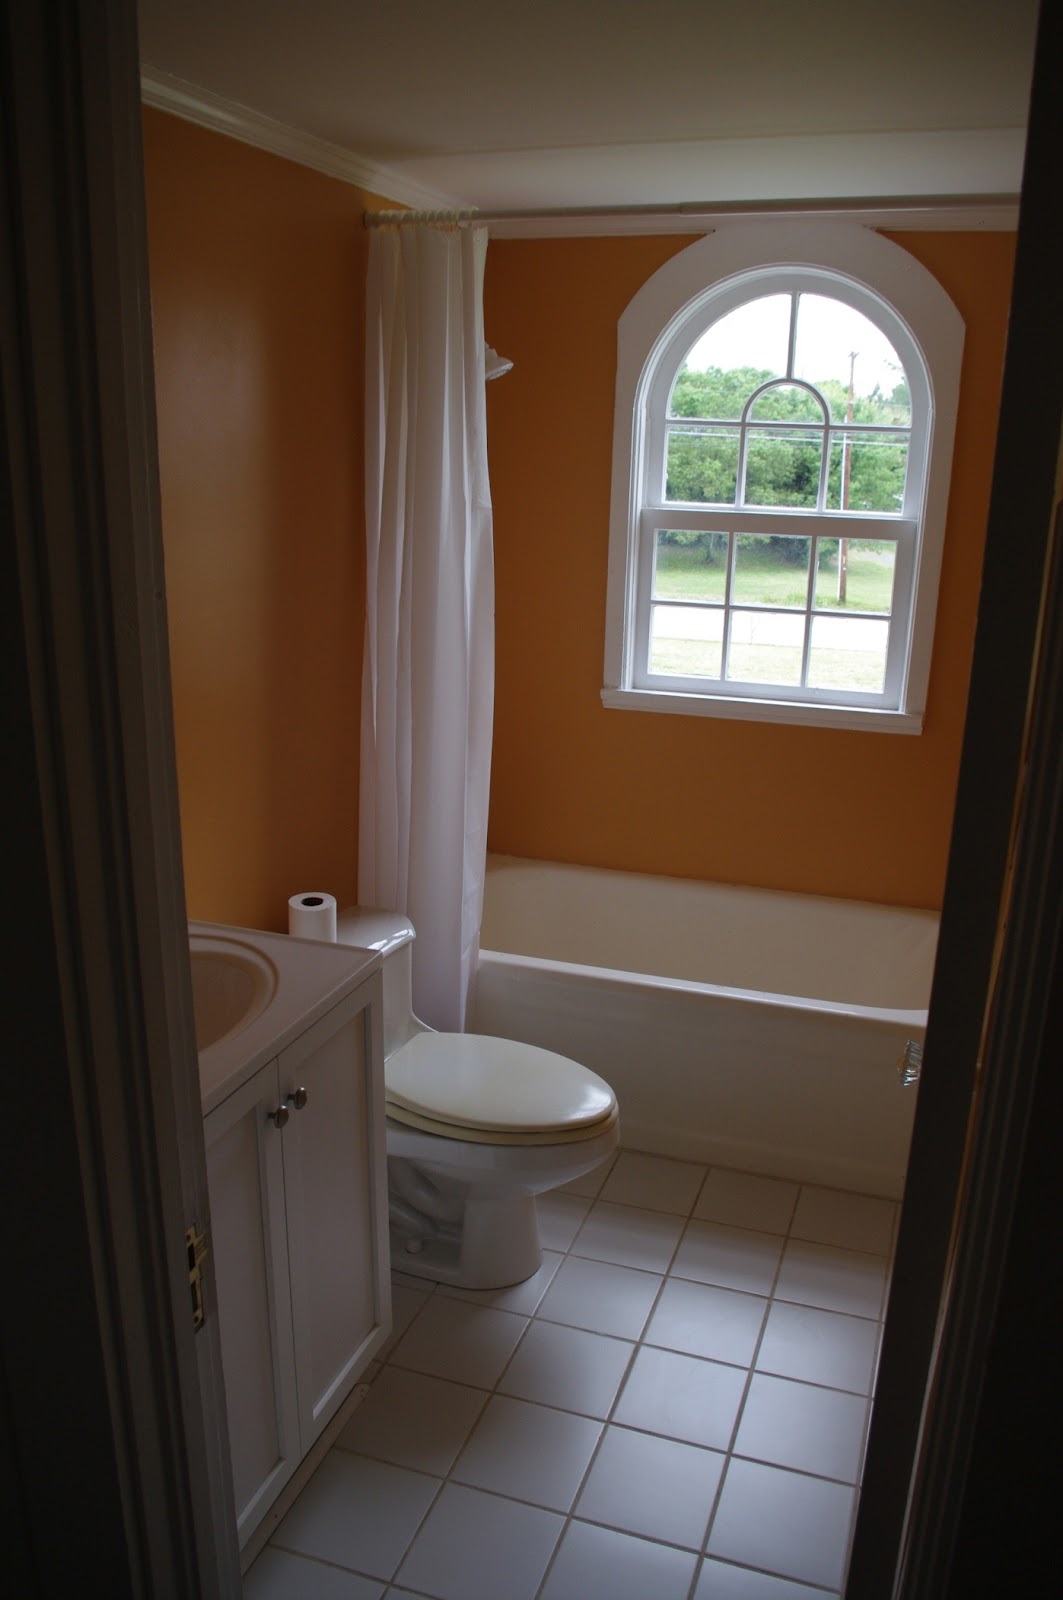
The upstairs bathroom is definitely a charming little bathroom.  Lots of potential here!  We think this is probably the original bathtub to the house, also.


Let's go outside.  

The landscaping needs work.  There's definitely evidence that someone once put a bunch of time and money into the landscaping.  It was unfortunately let go a bit, but we're really looking forward to putting our mark on all that's green.


Ahh yes.  The garage.  What a unique garage. There is  LOTS of light and a super tall ceiling.  Definitely, some great potential for this space.  Ultimately we know a larger shop/garage will have to be added on the property though.  We aren't really a two car garage kind of family.  Ha!


Super high ceilings!  Hmmm...  change the track routing and their will be room for a lift.  Hmmmm...  There is also an attic space above that ceiling.  That will have to be looked at a little closer as we aren't sure how usable it is.


So... that's what it looked like when we took possession.  Wait till you see what we start uncovering.  It certainly gets interesting and the ideas for the house really get exciting!

So until next time...
Thanks for stopping by!

- Holly, Scott, and Tucker